What is an NPC?[]
An NPC (Non Player Character) is a fictional character in the game. Each NPC has a name, traits, places in which he appears in various stages of the game, dialog lines which he says in certain situations, etc. He/She is a unique, specific character which, once killed, cannot return to the game. Pict.1 shows NPC Tobias Hoffman, the village leader of the Murky Waters.
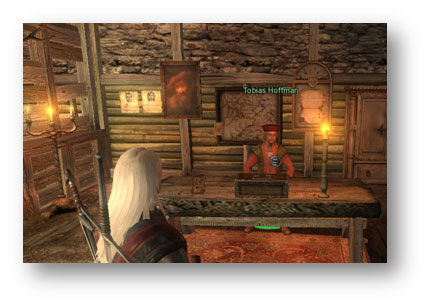
Pict. 1. An example of a fictional character
Creating an NPC file[]
In order to create an NPC file which will contain all of its properties, click File, choose New, Story NPC.
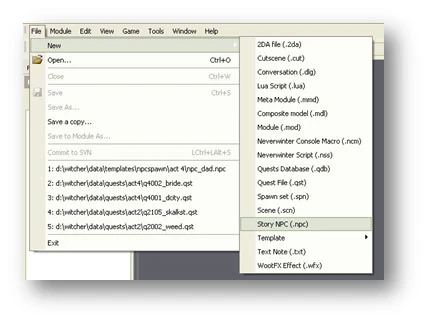
pict. 2. Creating an *.npc file
In the Comment window you can write a short description of the character (e.g. Tobias Hoffman, village leader). Each NPC functions like a phase (story phase). Within the quest or by using scripts you can change NPC phases, which results in a change in their behavior. In each phase determine what the character should do and the action point IDs (the places in which the character’s actions will take place) and also the spawnpoints (the places in which the NPC appears and disappears). In each phase we can change this information and thus regulate the way the character behaves throughout the game.
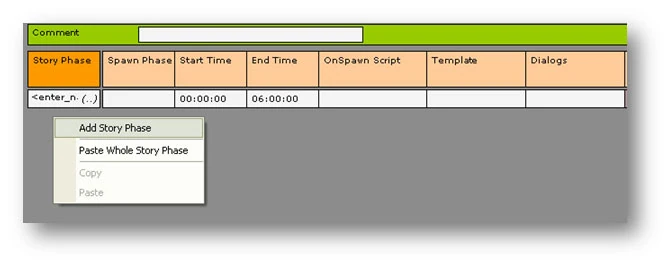
pict. 3. Adding a new Story Phase
In order to add a new story phase, click the right mouse button on the grey background and choose Add Story Phase (pict. 3). The first thing you should do is enter the name of the phase (in the first window labeled Story Phase). It should be simple and clear because you will have to enter it in each place where you will want to change the story phase.
In the next window, enter the spawn phase, which is a subphase of the story phase. There can be an unlimited number of spawn phases (add them by clicking with the right mouse button on the white box under Spawn Phase and choose Add Spawn Phase). This type of phase is usually responsible for different times of day in which the NPC does different things.
The next step is to set the time at which the NPC will do certain actions (set them separately for each spawn phase). The Start Time determines when the spawn phase will Begin and the End Time determines when it is finished. If you want a given character to be in a certain spawn phase all the time, enter 00:00:00 in both windows. When determining these times, it is important to remember that they can’t overlap -- an NPC can’t simultaneously be in two different spawn phases.
The OnSpawn Script window is used to pin scripts, which will be completed every time the NPC spawns (appears at the location). In order to add a script, double click on the white area below OnSpawn Script and choose the appropriate script from the list that appears. You can set a separate script for each spawn phase. Another very important aspect is adding the character template. To do so, double click on the white area below Template and choose the appropriate file from the list (you can find out more about creating templates in the chapter about them). An NPC can have a different template in each spawn phase, but in order for the change to be visible in the game the character must once again spawn (that is, disappear and reappear; this includes the player’s return to the location).
As opposed to commoners, NPCs don’t have dialog files pinned to the template because in each spawn phase they may need a different dialog (e.g. at night they tell the player that they are sleeping and don’t want to talk to him, during the day they give the player a task). In order to add a dialog, double click the white area below Dialogs and choose the dialog file from the list. Next, you must specify the spawn categories, which are ID that allows the NPC to know at which spawn points he should appear and disappear. To do this, click the brown area below Spawn Categories with the right mouse button and choose Add Category. Next, specify the name of the category. Note! It has to be exactly the same as the category entered in the appropriate spawn point. Each NPC can have an unlimited number of categories in each spawn phase.
 pict. 4. Adding action
Next, choose the actions (also called jobs) which the NPC will do in a given spawn phase. Actions are a set of animations which will be produced for a given character in a given moment. In order to add an action, click the right mouse button on the brown area below the Action List and choose Add Action. Next, choose the appropriate action from the list and double click on it. The name of the action will appear in the Action Name window and the Probability window will show the chance that the NPC will choose this action (in %). After adding all the actions you make sure that all the percentages add up to 100 (pict. 5). In the next window, always choose Action Looped True; if you don’t, then after finishing his action the NPC will go to the despawn point and disappear from the location. Double click the white area below Actions Looped and choose Yes.
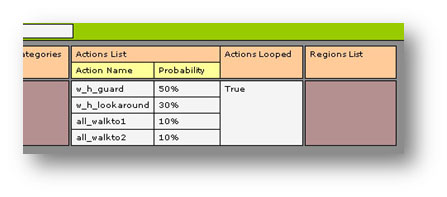
pict. 5. Actions and probability of them being chosen
In the Region List window enter regions, which are action point ID, for each spawn phase. Thanks to regions, the NPC will know in which action points he should carry out the actions you have chosen (of course these action points must also have the same actions added to their action list). In order to add a new region, click the right mouse button on the brown window under Region List and choose Add Spawn Region, then enter the name of the region- it must be exactly the same as the one in the specified action point.
Example of an NPC file[]
As an example we will use the file of Pat – the bricklayer’s son (see pic 6).
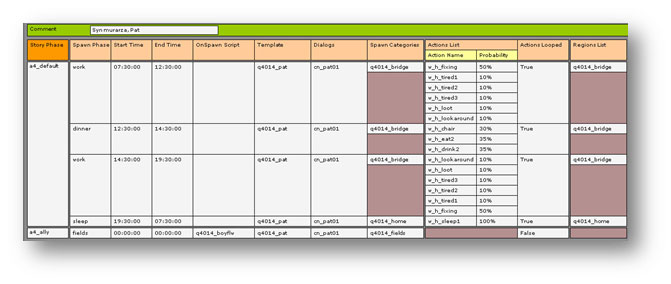
Pic 6. Example of an NPC file
Pat has two story phases named a4_default and a4_ally. The first story phase has four spawn phases: work, dinner, work and sleep (the names hint you on what Pat is doing during the respective phases). Story phase a4_ally has only one spawn phase, labeled fields. Let’s take a closer look at the individual phases.
From 7:30 to 12:30 Pat is in the work spawn phase. In this period he’s got the q4014_pat template and the cn_pat01 dialogue. He appears at the q4014_bridge spawnpoint, that is by the bridge he builds with his father. When you look at his actions, you will see that they are indeed a part of his work. Actions w_h_fixing contain the animation of striking something with a hammer; there is a 50 per cent chance that Pat will be engaged in this particular activity. In other words, in more or less half of the time between 7:30 and 12:30 Pat is going to strike something with a hammer at one of the action points of the q4014_bridge region and with the w_h_fixing action pinned to it. During the rest of the time he will be carrying out the tired action (w_h_tired1, 2 and 3), w_h_loot action (that is stooping down and picking something from the ground) and w_h_lookaround, that is looking around. During the next spawn phase Pat will be dinning nearby his place of work (between 12:30 and 14:30), then he will get to work again (again the work spawn phase, between 14:30 and 19:30). At 19:30 Pat will go to his despawn point because in the next phase he is set with another spawn category (q4014_home) which spawn point is located in his house. From 19:30 to 7:30 Pat will be carrying out the w_h_sleep action, which has the 100 per cent possibility in the action Point of q4014_home region, that is in his own bed. At 7:30 Pat will despawn from his house and reappear near the bridge, where he starts his cycle anew.
If you’ve carried out the bricklayer’s quest and chosen Pat’s company (he’s a great archer) in your expedition to the fields as a reward, Pat’s phase changes from a4_default to a4_ally. It comprises one spawn phase which lasts for the whole day. During the spawning (that is at the moment when the player enters the fields), the on spawn script, labeled q4014_boylfw, is triggered. It makes Pat follow the witcher. Because of that, he has no defined actions or regions of this phase - he simply doesn’t need them; you don’t want him to carry out any work at the action points. You only want him to follow the player everywhere.
Getting an NPC Story File to Spawn[]
To get a story NPC to spawn, you need to add the NPC story file in the Module Properties box.
1. In your Module Explorer, click on "Module Properties."
2. In the "Story NPC List" box, click on the folder icon that's on the right-hand side. This will give you a pop-up box.
3. In the pop-up box, you'll see all the Story NPC files that are available to you, which should include all of the ones you've added to your module. Drag the ones you want to spawn from the list on the right to the box on the left OR double-click on them.
4. Once all the files you want to spawn are in the box on the left, save your Module Properties, then save your module.
Here's a picture that should show most of this:
